Brake Noise, Pads, Rotors, and Pedal Problems: Complete Diagnosis
What does WD‑40 do to your brakes? It temporarily quiets a squeak, but at a dangerous cost. WD‑40 is a penetrating lubricant that soaks into brake pad friction material, reducing its ability to stop. You get a softer pedal and significantly longer stopping distances. That is not a fix — it is a short-term mask that can cause a crash.
Next action: Never spray WD‑40 on braking surfaces. Use only dedicated brake cleaner to remove grease and dust, or high-temperature silicone grease on the back of pads and slide pins. If you have already sprayed WD‑40 on the pad faces or rotors, replace those parts immediately before driving again.

Why Your Brakes Are Grinding – Likely Causes
A grinding noise when you apply the brakes almost always means metal-on-metal contact. The specific cause determines whether you need pads, rotors, calipers, or just a cleanup.
Worn Brake Pads Past the Wear Indicators
Most pads have a small metal tab that scrapes against the rotor when the friction material drops to about 2–3 mm. That produces a light, steady grinding sound. When the material is completely gone, the steel backing plate contacts the rotor directly — loud grinding with rapid rotor damage.
Example: Many Toyota Camry and Honda Accord models use a wear-indicator tab. If you hear grinding only when braking lightly, check the pads immediately. The rotor surface will likely already be scored.
Debris Stuck Between Pad and Rotor
A small stone or piece of road grit can lodge between the pad and rotor face, creating a grinding noise that comes and goes. This is usually a one-time rubbing sound that does not change with braking force.
Check: Inspect both sides of the rotor through the wheel spokes. If you see a scratch mark on the rotor face that follows a partial circle, debris is the likely cause. In many cases, removing the debris and inspecting the rotor for damage is sufficient.
Seized Caliper Slide Pin or Piston
When a caliper does not release fully, the pad stays pressed against the rotor. You will hear a constant dragging sound — like a card on bicycle spokes — that speeds up as the car accelerates. Over time, the rotor can warp and the pad can glaze over.
Example: Many Ford F-150 caliper slide pins stick if the factory grease dries out. The drag heats the brake fluid, reduces stopping power, and often triggers a wobble in the pedal. If you catch this early, cleaning and re-greasing the pins may be enough. If ignored, the caliper itself needs replacement.
Rotor Thickness Below Minimum
Rotors have a stamped minimum thickness spec — for example, 20 mm nominal with an 18 mm discard limit. Once they wear past that spec, the rotor can crack or fail under heavy braking. Grinding at this stage is often accompanied by a pulsating pedal.
Check: Use a micrometer to measure rotor thickness at the thinnest point. If at or below the discard spec, replace both rotors on that axle. Never machine a rotor that is already below its minimum thickness.
How Long Can You Drive with Grinding Brakes?
No safe distance if you hear metal-on-metal grinding. Stop driving as soon as it is safe — ideally, pull over and call for a tow. Here is what each symptom level means for your safety and your wallet:
| Symptom | Risk | Escalate When |
|---|---|---|
| Light grinding on brake application only (wear indicator) | Accelerated rotor wear; pads may still stop but damage rotors quickly. | Within 50 miles if driving to a shop at low speed only. |
| Loud constant grinding (backing plate on rotor) | Rotor can crack; caliper piston can overextend and leak fluid. | Immediate tow needed. Further driving risks complete brake failure. |
| Grinding with pulsing pedal | Rotor thickness variation or warping; stopping distance increases dramatically. | Do not drive. Risk of pedal going to the floor. |
What happens if you ignore grinding brakes? You will replace not just pads but also rotors, possibly the calipers, and in some cases the hub assembly. A complete front brake job on an F-150 — pads, rotors, and calipers — can exceed $1,000 at a shop, compared to roughly $300 for just pads and rotors if caught early.
What do grinding brakes sound like? A metallic, harsh scraping or growl that gets louder when you press the pedal. Light grinding while creeping forward without touching the brake usually means a dragging caliper, not worn pads.
Step-by-Step: Diagnosing and Fixing Grinding Brakes
This is a do-it-yourself job for any car owner with basic tools. Allow 1–2 hours per axle for a first attempt.
1. Before You Start – Safety and Tools
Park on level ground, set the parking brake, and chock the rear wheels. Never work under a vehicle supported only by a jack.
Tools needed: Jack, jack stands, lug wrench, C-clamp or brake piston tool, set of metric and SAE wrenches, torque wrench, brake cleaner, high-temperature brake grease, and a micrometer to measure rotor thickness.
Parts needed: New brake pads (ceramic or semi-metallic depending on your driving habits), new rotors if worn or scored, and a sealed bottle of DOT 3 or DOT 4 brake fluid.
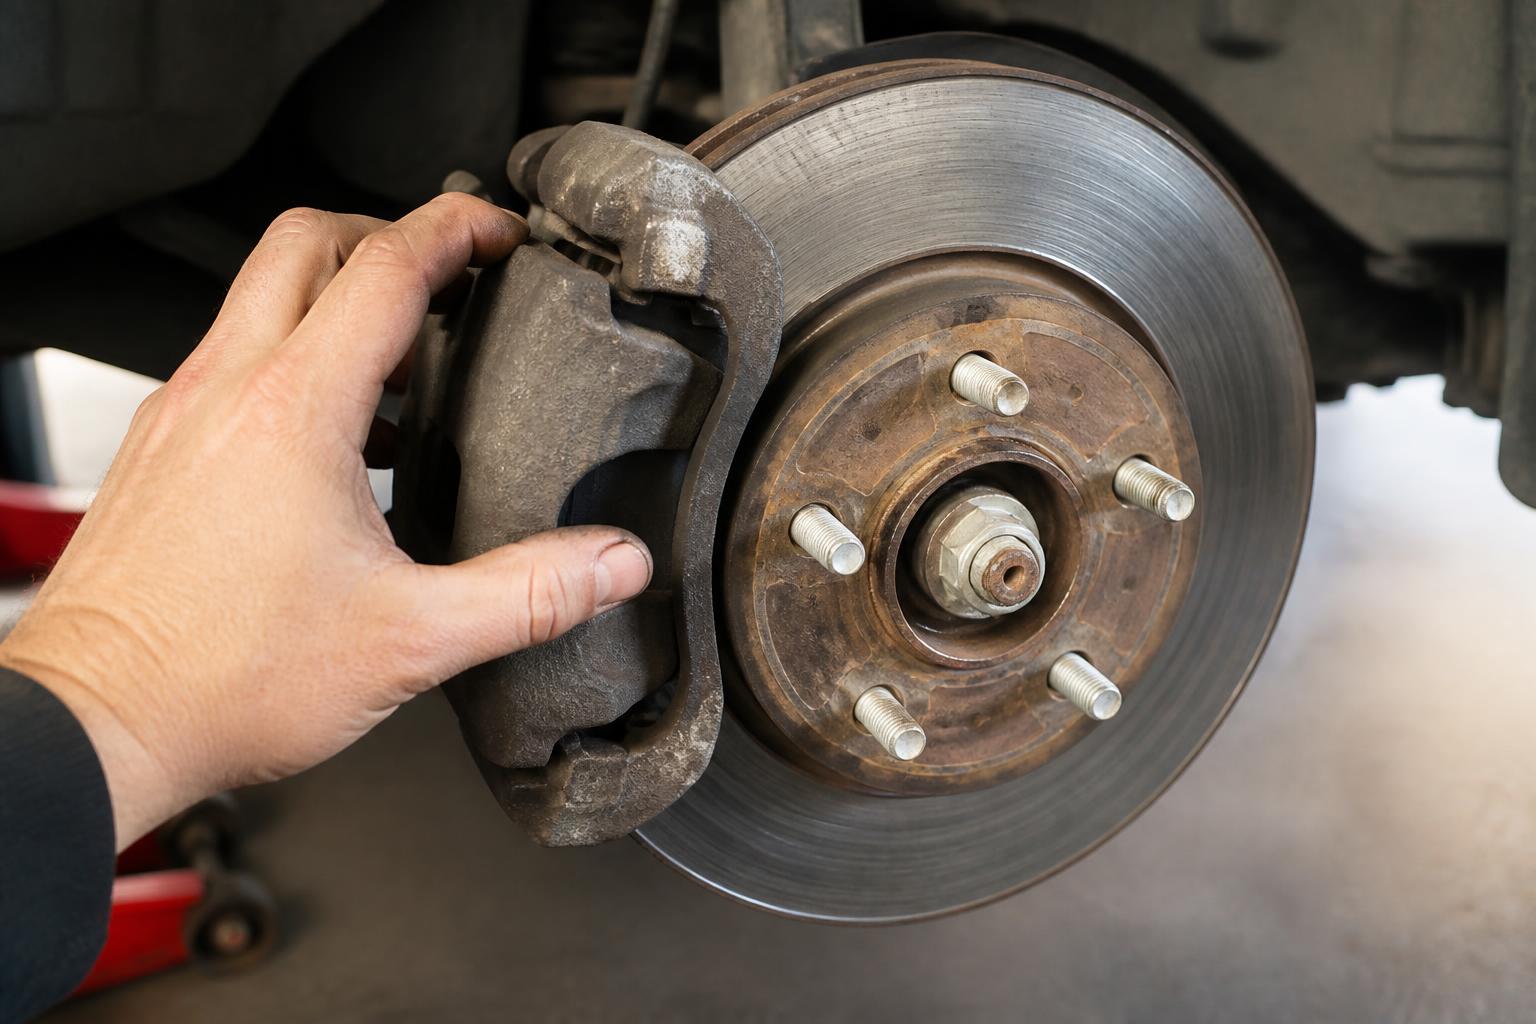
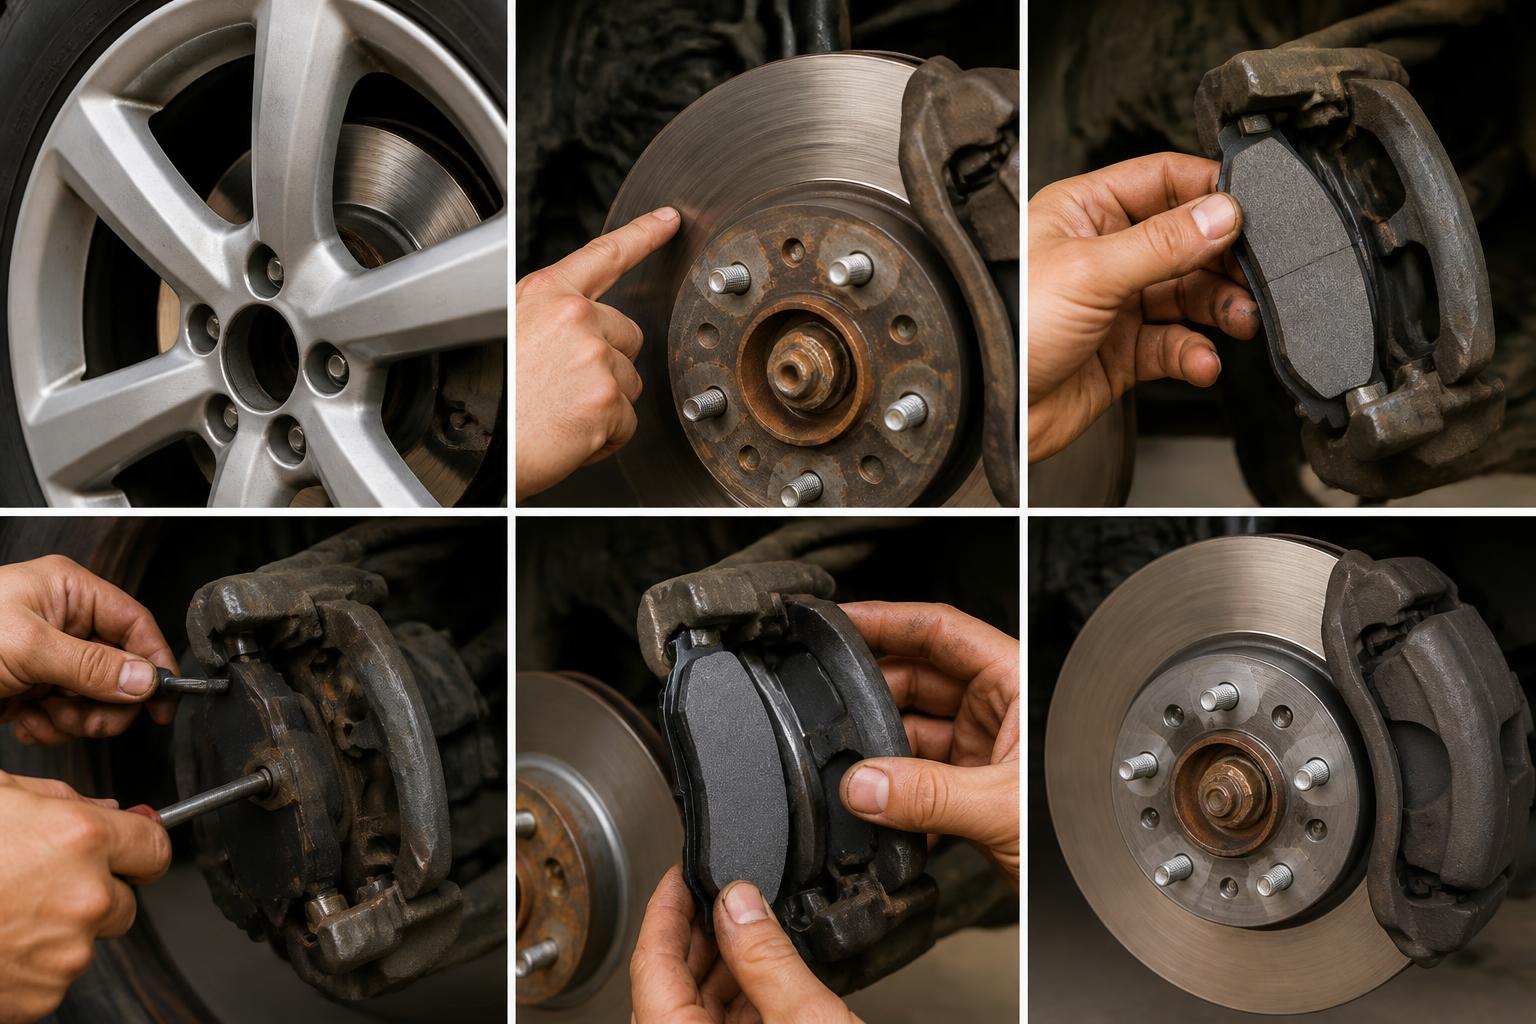
2. Remove Wheel and Inspect
Once the wheel is off, spin the rotor by hand and listen for scraping. Look at the pad through the caliper opening — if the friction material is less than 3 mm thick, replace pads and rotors as a set.
Check the inside pad as well. It often wears faster than the outer pad. A worn inner pad with a thick outer pad points to a seized caliper piston or slide pin.
3. Measure Rotor Thickness
Clean the rotor face with brake cleaner. Use the micrometer to measure at least four spots around the rotor — outer edge, middle, and inner edge. Write down the values. Compare them to the minimum thickness number stamped on the rotor edge or listed in the owner’s manual.
Concrete example: A 2020 Honda Civic rotor has a minimum thickness of 18 mm. If your reading shows 17.8 mm anywhere, the rotor must be replaced, even if the pads still have material left.
4. Remove Caliper and Pads
Unbolt the caliper slide pins — usually two bolts. Hang the caliper from the suspension spring using a zip tie or wire. Never let it dangle on the brake hose, which can damage the hose internally.
Remove the old pads and brake hardware — clips and anti-rattle springs. Inspect the caliper piston. If it is rusty or difficult to push back, the caliper should be rebuilt or replaced.
5. Replace Rotors If Needed
Remove the rotor retaining screw if one is present. Tap the rotor with a hammer to break it loose from the hub. Install the new rotor, making sure it sits flush against the hub face. Secure it with the retaining screw or by temporarily tightening a couple of lug nuts.
6. Lubricate and Install New Pads
Apply a thin coat of high-temperature brake grease to the backs of the new pads where they contact the caliper. Also grease the slide pins and the edges of the pad backing plates that slide in the bracket.
Critical: Do not get grease on the pad friction material or the rotor face. If it happens, wipe it off immediately with brake cleaner and let it dry fully before assembly.
7. Reinstall Caliper and Bleed If Needed
Use the C-clamp or brake piston tool to push the caliper piston back slowly. Watch the brake fluid reservoir — if it overflows, suck some out with a turkey baster before continuing.
Bolt the caliper back on. Torque the slide pins to spec, typically 25–35 lb-ft but verify in your vehicle’s service manual. Reinstall the wheel and torque the lug nuts to spec in a star pattern.
8. Bed-In the New Brakes
Drive to a safe empty road. Make six to eight moderate stops from 30 mph down to 5 mph, allowing about 30 seconds of cool-down between stops. Then make two to three harder stops from 45 mph. This transfers pad material evenly to the rotor surface.
Success check: After bedding, the pedal should feel firm. No grinding, no pulsing, and the car should stop in a straight line without pulling.
Where People Often Get Stuck
Seized slide pins: If the caliper will not slide smoothly after cleaning, the pin or bore is corroded. Clean both with a wire brush, apply fresh grease, and test again. If the pin is pitted, replace it — replacement slide pin kits are inexpensive and available at any auto parts store.
Piston will not push back: This is usually caused by a seized caliper due to age or internal corrosion. Replace the caliper rather than forcing it. A damaged piston will eventually leak fluid and fail completely.
Reservoir overflow: Use a turkey baster to remove old fluid from the reservoir before pushing the piston back. Top off with fresh fluid after reassembly. Brake fluid absorbs moisture over time, so bleeding the system every two years is good practice.
Quick Decision Checklist: Need a Brake Job Now?
Use this before driving again.
- [ ] Grinding noise when braking? → Stop driving. Check pads and rotors before moving the car.
- [ ] Pedal pulsates or vibrates? → Rotors are likely warped or below minimum thickness. Replace rotors and pads.
- [ ] Brake warning light on? → Low fluid often means worn pads or a leak. Top off fluid but have the system inspected.
- [ ] Car pulls to one side when braking? → Seized caliper or uneven pad wear. Inspect both sides immediately.
- [ ] Low brake fluid without a visible leak? → Pads are worn thin. Do not drive. Add fluid only to move the car a short distance if absolutely necessary.
- [ ] Scoring marks on the rotor face? → Replace rotors if scoring is deeper than roughly 0.5 mm or if you can feel grooves with your fingernail.
If you check even one of these items, perform a full visual inspection before any further driving. A few minutes of checking can save you hundreds of dollars in additional damage.
FAQ
Can you spray WD-40 on brakes to stop squeaking?
No. WD-40 will stop the squeak temporarily by lubricating the friction surface, but it reduces pad grip and increases stopping distance. The only safe lubricant for brakes is high-temperature brake grease applied to the backing plates and slide pins — never on the friction surface.
How far can you drive when your brakes are grinding?
Zero miles if you hear constant metal-on-metal grinding. A light wear-indicator noise may allow a low-speed trip to a nearby shop, but you risk rotor damage that will increase repair cost. If the grinding is loud or constant, call for a tow.
Can police pull you over for grinding brakes?
Yes. In most states, defective brakes qualify as equipment violations. Grinding brakes that are clearly unsafe can result in a ticket or a fix-it order, and officers may require proof of repair.
What is the 30-30-30 brake pad rule?
Some repair guidelines recommend 30 seconds of moderate braking, 30 seconds of cool-down, repeated 30 times when bedding in pads after a rotor skim. However, modern rotors are rarely skimmed — replacement is the standard practice for most vehicles. Always follow the pad manufacturer’s bed-in procedure printed on the box.
Can I change brakes by myself?
Yes, if you have basic mechanical experience, the right tools, and follow all safety steps. The job on a typical F-150 takes about 1–2 hours per axle for a first-timer. If you are unsure about any step, a shop can complete the job in under an hour per axle.
What can I use instead of brake lubricant?
There is no safe substitute for high-temperature brake grease. Regular grease, oil, or WD-40 will melt, run onto the rotor, or degrade the rubber caliper boots. Buy the correct product — a small tube of brake grease costs about $5 at any auto parts store.
Explore This Topic
- Back to Brake Noise Pads
- Back to Automotive Repair
Related guides in this cluster:
- Suspension Noise, Struts, Shocks, and Control Arms: Diagnosis
- Exhaust Smoke Color: White, Blue, Black — Diagnosis Guide
- Starter Motor Failure: Symptoms, Diagnosis, and When to Replace

Greedy Wheels is the founder and lead editor at Wheels Greed. With over 15 years of hands-on automotive experience — from rebuilding engines in a home garage to managing fleet maintenance for a regional logistics company — he brings real-world mechanical knowledge to every guide.
His work has been featured in automotive forums, owner communities, and dealership training materials. When he’s not researching the latest car owner questions, you’ll find him at a local track day, wrenching on his project car, or testing the newest OBD2 diagnostic tools.
At Wheels Greed, every article is reviewed against manufacturer service manuals, NHTSA bulletins, and verified owner reports. No AI-generated fluff. No guesswork. Just practical answers from someone who has turned the wrench.