Why your Honda backup camera is not working and what to check before replacing parts
If your Honda backup camera has suddenly stopped displaying an image, the most common reasons are simple electrical issues or loose connections, not necessarily a failed camera. Before you consider costly part replacements, several straightforward checks can often restore functionality. This guide outlines the most probable causes and provides a logical sequence for troubleshooting.
Initial Checks for Obvious Issues
Before proceeding to more involved diagnostics, confirm that the problem isn’t a temporary system glitch or something easily overlooked.
- Verify Reverse Gear Engagement: Ensure your Honda is actually in reverse (R). The backup camera system is designed to activate exclusively when the transmission is shifted into reverse.
- Clean the Camera Lens: Visually inspect the camera lens located on the rear of your vehicle. Dirt, mud, snow, ice, or even a spiderweb can obscure the view. Gently clean the lens with a soft, damp cloth.
- Test Infotainment System: Confirm that your Honda’s main infotainment screen and other display functions are working correctly. If the entire screen is blank or unresponsive, the issue might lie with the display unit itself rather than the camera.
Perform an Infotainment System Reset
A system reset is frequently the quickest and most effective way to clear electronic glitches that might be preventing the backup camera from operating. The exact procedure can vary by Honda model and year, but often involves a simple power cycle.
1. Turn Off the Vehicle: Ensure the ignition is completely off and all electrical accessories are powered down.
2. Open and Close Driver’s Door: This action can sometimes help fully discharge the vehicle’s electrical system.
3. Wait 5-10 Minutes: Allow sufficient time for the system’s temporary memory to clear.
4. Restart the Vehicle: Turn the ignition back on. Shift into reverse to check if the camera now displays an image.
For certain models, a more comprehensive reset might involve temporarily disconnecting the car battery. However, proceed with caution, as this can reset other vehicle settings like radio presets and may require a radio code. Always refer to your owner’s manual for specific reset instructions for your Honda.
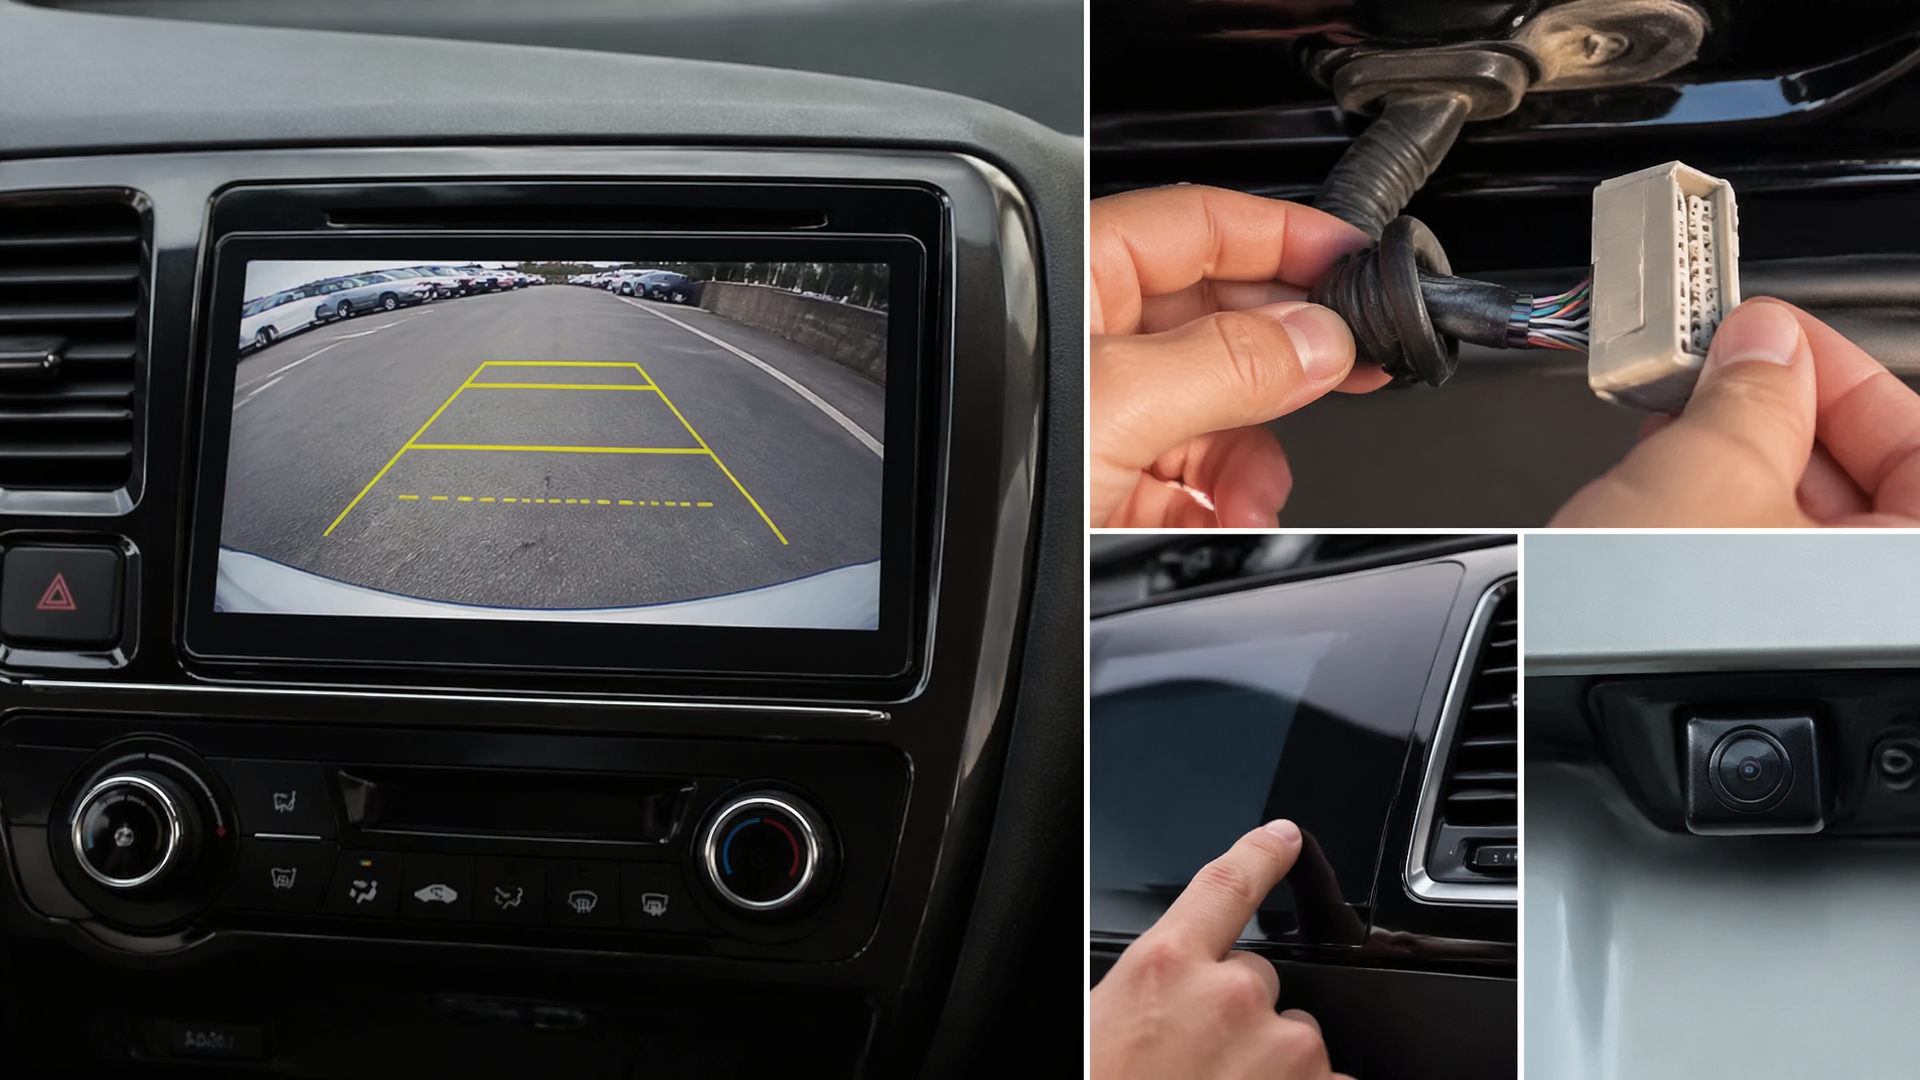
Inspect Wiring and Connections
Damaged or loose wiring is a frequent cause of backup camera malfunctions. The camera’s signal relies on a wiring harness that can become dislodged, corroded, or frayed over time due to road vibrations or exposure to the elements.
- Trunk/Tailgate Area Inspection: The wiring for the backup camera often passes through the trunk lid or tailgate. Open the trunk or tailgate and carefully examine the protective rubber boot where the wiring enters the vehicle body. Look for any signs of exposed wires, pinching, or cuts. Gently check that all visible connectors are firmly seated.
- Underbody Wiring Check: In some instances, wiring can be exposed underneath the vehicle. This is more common on older models or if aftermarket accessories have been installed. If you are comfortable and have the means to safely support the vehicle, a visual inspection of the wiring loom running from the rear might reveal damage. Prioritize safety: never get under a vehicle that is not properly secured with jack stands.
Verify Relevant Fuses
A blown fuse can cut power to the backup camera system or the infotainment unit responsible for displaying its image.
1. Locate Fuse Boxes: Your Honda typically has fuse boxes in the cabin (often under the dashboard or near the steering column) and under the hood. Consult your owner’s manual for their precise locations.
2. Identify Camera/Infotainment Fuses: Use the fuse box diagram, usually found on the fuse box cover or in the owner’s manual, to locate fuses associated with the infotainment system, display audio, or backup camera.
3. Examine Fuses: Carefully remove the suspected fuse using a fuse puller (often found in the fuse box) or needle-nose pliers. Hold the fuse up to a light source and check if the metal filament inside is broken.
4. Replace Blown Fuses: If a fuse is blown, replace it with a new fuse of the exact same amperage rating. Using a fuse with a higher rating can lead to electrical damage.
Check for Software Updates or Recalls
Modern Honda vehicles utilize complex software for their infotainment systems, and occasional glitches can impact camera functionality.
- Review Honda Recalls and TSBs: Visit the official Honda website or contact a dealership to inquire about any outstanding recalls or Technical Service Bulletins (TSBs) related to your vehicle’s infotainment system or backup camera.
- Dealer Software Update: If the previous troubleshooting steps have not resolved the issue, your Honda dealer can check for and install the latest available software updates for your infotainment system. This can sometimes rectify bugs that cause accessory malfunctions.
When Professional Diagnosis is Needed
If you have completed the above troubleshooting steps and your Honda backup camera remains non-functional, the problem may be more intricate and require specialized diagnosis.
- Internal Camera Failure: The camera unit itself may have failed due to internal damage, water intrusion, or age.
- Control Module Malfunction: The electronic module that processes the camera’s signal could be faulty.
- Extensive Wiring Harness Damage: Significant damage to the wiring harness that cannot be easily repaired may necessitate professional intervention.
At this stage, it is recommended to contact your local Honda dealership or a qualified automotive electronics specialist. They possess the necessary diagnostic tools and expertise to accurately identify the root cause and perform the required repairs, which could involve replacing the camera, wiring harness, or related electronic modules.

Greedy Wheels is the founder and lead editor at Wheels Greed. With over 15 years of hands-on automotive experience — from rebuilding engines in a home garage to managing fleet maintenance for a regional logistics company — he brings real-world mechanical knowledge to every guide.
His work has been featured in automotive forums, owner communities, and dealership training materials. When he’s not researching the latest car owner questions, you’ll find him at a local track day, wrenching on his project car, or testing the newest OBD2 diagnostic tools.
At Wheels Greed, every article is reviewed against manufacturer service manuals, NHTSA bulletins, and verified owner reports. No AI-generated fluff. No guesswork. Just practical answers from someone who has turned the wrench.